Any player who wants to make Banners in Minecraft will need to acquire a Loom, which can be done by either discovery or crafting. So, how do we do it?
With so much emphasis on crafting in the game, it seems sense that many of the blocks have more than one use, adding a layer of interesting, organic intricacy.
A loom is a type of block that can be found in the world or crafted by the player using a small number of materials.
Here you will find how to make a loom in Minecraft.
Understanding the Loom in Minecraft
The Loom in Minecraft is a crafting station primarily used for designing and creating decorative banners.
It simplifies the process of adding patterns, shapes, and colors to banners, allowing players to customize their banners with ease.
Banners, in turn, can be used for various purposes, including decoration, signaling, and personalization.
Read Also:
- How To Make A Saddle In Minecraft
- How to Make Concrete in Minecraft
- How to Make Smooth Stone in Minecraft
Key Aspects of the Loom in Minecraft:
- Crafting Station: The Loom is a crafting table with a unique purpose, specializing in the creation of banners.
- Pattern Creation: The Loom simplifies the banner design process by providing a user-friendly interface for adding patterns and colors.
- Customization: With the Loom, players can customize their banners by choosing from a variety of patterns and colors, making each banner unique.
- Decoration and Identification: Banners created with the Loom can be used to decorate structures, mark territories, or personalize shields and flags.
Significance of Making a Loom in Minecraft
Creating a Loom in Minecraft is significant for several reasons:
- Decorative Creativity: The Loom empowers players to express their creativity by designing unique banners and adding decorative elements to their Minecraft world.
- Customization: Custom banners can serve as identifiers for player bases, landmarks, and territories, enhancing navigation and personalization.
- In-Game Artistry: Players can use the Loom as a means of in-game artistry, producing intricate designs and patterns that can be displayed proudly.
- Functional Signaling: Banners created with the Loom can also serve functional purposes, such as signaling locations or marking important areas.
How To Find A Loom In A Village
The best chance of finding a Loom is to explore the area thoroughly, both outside and inside of buildings.
If players come across a villager with the Shepherd Job Block, it’s in their best interest to follow them, as they will inevitably take them to a Loom. Now let’s find out how to make a loom in Minecraft.
How to Craft a Loom in Survival Mode
The loom block is the one that can be used to create banners in Minecraft. Banners serve a distinct purpose in the game, both as a means of decoration and as a very adaptable piece of equipment.
Banners are a great way to express your individuality while also showing your community and tribe pride.
Step 1. Open the Crafting Menu
To begin, unfold your crafting grid (3×3) as shown below on your work surface: Space for making things that measures 3 by 3
Step 2. Add Items to make a Loom
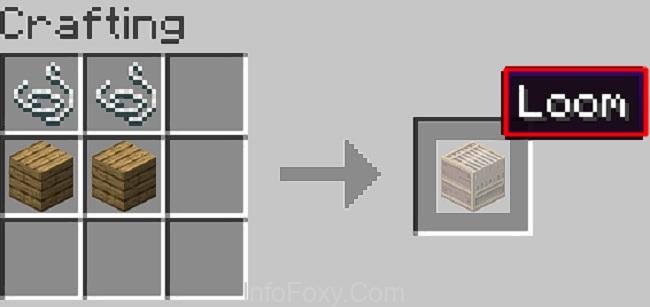
The crafting menu will reveal a 3×3 crafting grid for your perusal. A loom can be created by placing two pieces of string and two pieces of wood in a three by three grid.
Oak, spruce, birch, jungle, acacia, dark oak, mangrove, bamboo, scarlet, and warped planks can all be used in woodworking projects. Here we’ll use oak boards as an illustration.
The thread and wooden planks for a loom must be arranged in the precise fashion depicted in the image below.
One string needs to go in the first box and another string needs to go in the second box in the first row. Each box in the second row should include two wooden slats, with one placed in the top left corner. The Minecraft loom crafting instructions are as follows.
Step 3. Move the Loom to Inventory
You must transfer the loom to your inventory after you have finished crafting it.
How To Use A Loom
Dye is required to operate a Loom, and the ink from a squid sac is the most convenient and cost-effective source. Find a squid in a nearby river or lake and catch an ink sac from it! Six different banner patterns exist, each of which requires a certain item or block to create.
Using A Loom For Crafting Banners
While the Loom’s menu may seem daunting at first owing to its intricacy in comparison to other crafting blocks, taking it one part at a time might help users learn how to use them to create Banners.
A blank Banner can go in the top left slot, any kind of Dye can go in the top right, and a Banner Pattern can go in the bottom left slot (if desired) (bottom).
If you don’t have a Banner Pattern in the component slots at the bottom, you can choose the type of pattern you wish to make by pressing the appropriate button.
Using A Loom To Employ A Shepherd
A jobless villager who approaches a Loom will be transformed into a Shepherd, who can be traded with for Emeralds and Loom-related objects and blocks.
Read Also:
- How to Make a Toilet in Minecraft
- How to Make a Smoker in Minecraft
- How to Make Scaffolding in Minecraft
Conclusion
With a loom, players of Minecraft may create virtually anything they can imagine. To decorate your flags and shields, looms provide you with seven unique designs. Although these blocks are simple to create, a sizable number of materials is needed to personalize each flag.
Each Loom has three compartments: one for the banner itself, one for the dye color, and one for the banner design. The machine can be used without the banner pattern slot.
All sorts of flags and signs can be made using the 34 available designs and 7 available spaces. Hope this guide helped you to find out how to make a loom in Minecraft. Thanks For Read the our Article.


