A smoothly functioning computer is essential for productivity and a pleasant user experience.
However, users of Windows operating systems may sometimes encounter performance issues, with one common problem being the “NET Runtime Optimization Service High CPU Usage” error.
In this comprehensive article, we will explore the meaning of the NET Runtime Optimization Service (Ngen.exe), understand the causes behind high CPU usage, and provide effective solutions to address this issue.
Understanding the NET Runtime Optimization Service
The NET Runtime Optimization Service, often referred to as Ngen.exe, is a component of the Microsoft .NET Framework. Its primary purpose is to optimize and compile .NET assemblies in the background to improve the execution speed of managed applications.
Ngen.exe precompiles these assemblies, reducing the need for just-in-time (JIT) compilation at runtime, which can result in faster application launch times and reduced CPU usage during application execution.
Read Also:
What is the NET Runtime Optimization Service High CPU Usage Error?
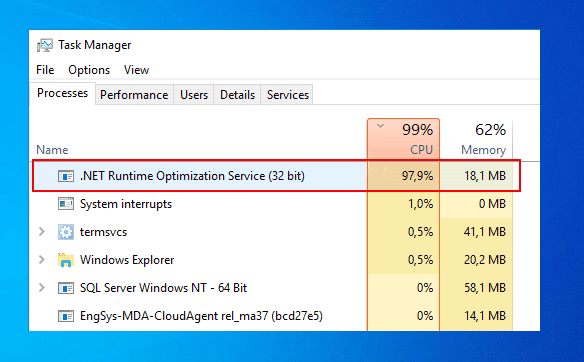
The NET Runtime Optimization Service High CPU Usage error occurs when the Ngen.exe process consumes an unusually high amount of CPU resources, causing performance degradation on the computer.
When this error occurs, users may experience slow system response, delayed application launches, and reduced overall system performance.
Common Symptoms of the Error
When encountering the NET Runtime Optimization Service High CPU Usage error, users may notice the following symptoms:
- High CPU Usage: The Task Manager or a system monitoring tool will show that the Ngen.exe process is utilizing a significant portion of the CPU’s processing power.
- Sluggish Performance: The computer may become noticeably slower, with delays in opening applications, navigating the operating system, and executing tasks.
- Unresponsive Applications: Applications may freeze or become unresponsive, especially when Ngen.exe is consuming excessive CPU resources.
Causes of the NET Runtime Optimization Service High CPU Usage Error
Several factors can contribute to the NET Runtime Optimization Service High CPU Usage error. Identifying the underlying causes is crucial for effective resolution. Common causes include:
- Background Compilation: The Ngen.exe process may be performing background compilation of .NET assemblies, which can temporarily increase CPU usage.
- Corrupted or Incomplete Compilation: If a compilation process is interrupted or corrupted, Ngen.exe may repeatedly attempt to recompile assemblies, causing sustained high CPU usage.
- Large Software Updates: The installation of .NET Framework updates or large software installations can trigger Ngen.exe to compile extensive amounts of code, leading to high CPU usage.
- Conflicts with Security Software: Some security software, such as antivirus programs, may conflict with Ngen.exe or its compilation process, causing increased CPU usage.
- Outdated .NET Framework: An outdated or incompatible version of the .NET Framework can lead to compatibility issues, causing Ngen.exe to consume excessive CPU resources.
How to Fix .NET Runtime Optimization Service High CPU Usage
Addressing the NET Runtime Optimization Service High CPU Usage error requires a systematic approach to identify and resolve the underlying causes. Here are effective solutions to help you mitigate this issue and restore optimal system performance:
Solution 1: Optimising The Process
The Optimization process which was running slow can be fixed with just two commands already available in your PC.
Step 1: Firstly, take the cursor to the Start Menu and tap it. Alternatively, one may go for the Search bar right next to the Start Menu.
Step 2: Then, type and Search for ‘Command prompt’ application. Select it.
Step 3: Out of many options, choose the ‘Run as administrator’ option.
Step 4: If the machine asks for permission to make changes for the device or not, click on ‘yes’.
Step 5: There will be three commands flashing on the screen. Out of these three, only two are to be copied. If you are using a 32- bit operating system, copy the first row of command and paste it right beside the third command. Press Enter right after. If you are using a 64- bit operating system, copy the second command and paste it right beside the third command and press Enter.
Step 6: Once again you copy the third row of command and paste it right beside the fourth command and press Enter.
The screen may show some activities running in the background. Moreover, it may take approximately three minutes for the installation to be complete.
Step 7: Next, we advise you to Restart the PC for better results after the installation is complete. Now if you go back to the Task Manager then the CPU usage goes back to normal.
Solution 2: Scan Your Computer For Malware
Undoubtedly the malware is the prime reason for high CPU usage in most of the cases. This is so because they mask themselves like any other computer application or service.
In order to solve this, one can opt for many anti-malware tools like ‘Malwarebytes Anti-Malware’ or ‘Avast’ by visiting their official sites and installing the same.
For ‘Malwarebytes Anti-Malware’:
Step 1: Visit the official site. Download a free or better say the Trial version of it. If your machine is too prone to malware considering the games you play, or the job you do, or the daily downloads you need, you can buy the entire suite for future protection.
Step 2: Check for the Downloads on your PC. Click on the recently downloaded application of ‘Malwarebytes Anti-Malware’. Click on all further instructions like ‘OK’, ’NEXT’, etc. to complete its installation process wherever you desire.
Step 3: Now open the ‘Malwarebytes Anti-Malware’ app on your PC.
Select the option ‘scan’ to scan your machine for all malwares. This may take some time. Keep the machine undisturbed during the time of scanning.
Step 4: After the scan is complete, your machine will ask your permission for the deletion of the files. Make sure to delete them.
Step 5: Restart the PC and check into the task manager to confirm normal CPU usage.
Step 6: Since a single app may not be sufficient enough to detect and remove all the viruses and malwares from the machine, it should be noted that you use other security scanners like Netsparker, Intruder, Acunetix and so on.
Solution 3: Restarting The Service
Step 1: Firstly, go to the Start Menu of your PC. Right-click the Start Menu. There will be an option ’run’ by the bottom of the list of options. Select this ‘run’ option.
Else you can choose to press the Windows key + R key of your keyboard simultaneously to do the above.
Step 2: Remove whatever is written on the newly popped box. Then type ‘services.msc’ in the newly made space. Then click OK in order to open the Services tool.
Step 3: Find the ‘NVIDIA Telemetry Container’ service on the list, right-click on it and then select ‘Properties’ from the menu.
Step 4: Be aware that the option under the Startup type menu in the properties window is set to Automatic. Confirm all the other options popping up for permission to change the startup type.
Step 5: If the service has started itself, click on the STOP bar placed right beside the START bar. Then, again click on the START button to run it.
Step 6: If you receive an error 1079 message, then right after the properties menu, click on Log On tab and then click on the Browse… button.
Step 7: You get the ‘Enter the object name to select’ entry box. Here, type in your account’s name and click on Check Names. Wait for the name to save.
Step 8: Lastly, click OK. Type in a password of your choice in the PASSWORD section if asked so.
Solution 4: Performing A Clean Boot
It may be possible that the apps that are not voluntarily used or opened, maybe running in the background. This leads to unnecessary usage of CPU or heating of CPU which can be fixed.
Step 1: Firstly, go to the Start Menu of your PC. Right-click the Start Menu. You will see an option ’run’ by the bottom of the list of options. Select this ‘run’ option.
Else you can choose to press the Windows key + R key of your keyboard simultaneously to do the above.
Step 2: Next, remove whatever is written on the newly popped box. Then type ‘msconfig’ in the newly made space. Then click OK in order to open the Services tool.
Step 3: Put a tick on ‘Hide All Microsoft Services’.
Step 4: Click on ‘Disable All’.
Step 5: Following that, click on Apply. Then click on OK. Select ‘Restart Later’ as it pops on.
Step 6: Once again repeat steps 1 and 2. Now in ‘system configuration box, select Startup and ‘Open Task Manager’.
Step 7: Now in ‘Start-up Impact’, disable the ones with ‘high impact’. This stops the apps from working themselves automatically in the background.
Read Also:


