The Windows operating system is known for its stability and user-friendliness, but like any complex software, it can encounter errors from time to time. One such error that Windows 10 users may come across is the “nvlddmkm.sys” error.
This error message may seem cryptic, but it has specific implications related to your graphics hardware and drivers.
In this comprehensive article, we will delve into the meaning of the nvlddmkm.sys error, understand its causes, and provide effective solutions to address it.
Understanding the nvlddmkm.sys Error
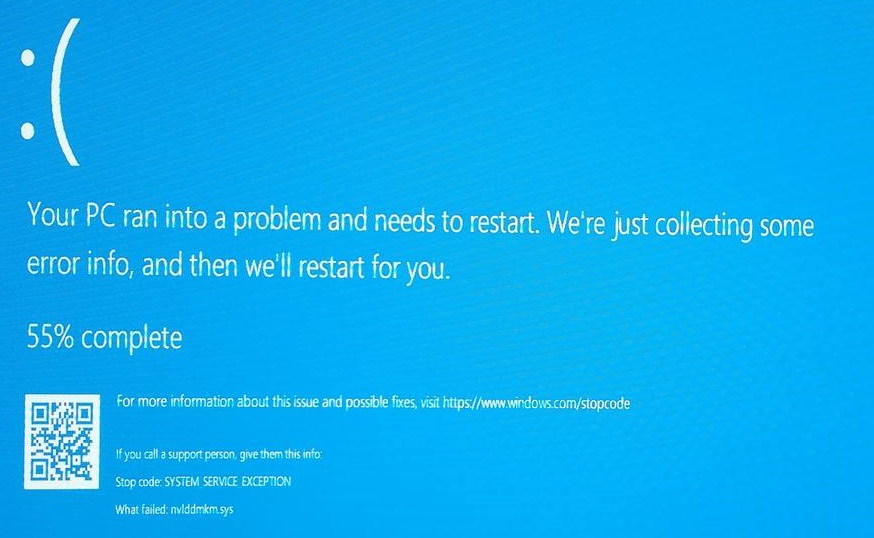
The “nvlddmkm.sys” error is a blue screen error (often referred to as the Blue Screen of Death or BSOD) that occurs on Windows 10 systems.
This error message points to a problem related to the “nvlddmkm.sys” file, which is a crucial component of NVIDIA graphics drivers.
The file is responsible for the communication between the Windows operating system and NVIDIA graphics hardware.
Read Also:
Common Scenarios When the Error Occurs
The nvlddmkm.sys error can occur in various scenarios, including:
- Gaming: It may happen while playing graphically demanding games or using graphics-intensive applications.
- Video Playback: Watching videos or streaming content that uses hardware acceleration can trigger the error.
- Driver Updates: Installing or updating NVIDIA graphics drivers can sometimes lead to this error if the installation is incomplete or incorrect.
- Overclocking: Overclocking the graphics card, altering its settings, or using it beyond its recommended limits can result in this error.
- Hardware Issues: Underlying hardware problems with the graphics card, motherboard, or power supply may contribute to the error.
Common Symptoms of the Error
When you encounter the nvlddmkm.sys error on your Windows 10 system, you may observe the following symptoms:
- Blue Screen of Death (BSOD): The most noticeable symptom is the appearance of a blue screen with the error message, followed by an automatic system restart.
- Automatic Restart: Your computer will restart automatically after displaying the error message, interrupting any ongoing tasks or work.
- Data Loss: In some cases, a system crash caused by this error may result in data loss if unsaved work was present at the time of the crash.
- Graphics Glitches: Before the system crashes, you may notice graphical artifacts, screen flickering, or display glitches.
Causes of the nvlddmkm.sys Error
The nvlddmkm.sys error can be caused by various factors, and pinpointing the exact cause is essential for effective resolution. Common causes include:
- Corrupted Graphics Drivers: Outdated, corrupted, or incompatible NVIDIA graphics drivers can lead to this error.
- Overclocking: Overclocking the graphics card beyond its recommended limits can make it unstable and trigger the error.
- Hardware Issues: Problems with the graphics card, motherboard, power supply, or RAM can contribute to the error.
- Software Conflicts: Conflicts with other software, especially third-party graphics-related applications, can lead to instability and the error.
- Windows Updates: Issues with Windows updates or conflicts with system updates can result in the error.
How To Fix nvlddmkm.sys Error on Windows 10
Windows 10 users running them, have started complaining about an error called as: nvlddmkm.sys.
Method 1: Reinstall Graphics Card Driver
Windows do not give permission to install Graphics Card Driver if you are logged in as a Guest or Standard user.
Few of the organizations do not give permission to the user to work on what they install. In case of that, user can contact his/her system admin.
- Before starting, firstly, create a backup of the booting of your system.
- Secondly, what you have to do is to install intel Graphics driver .Remember to quit all applications running on the desktop.
- Download theversion: 24.20.100.6286 approved by Adobe.
- Then, just unzip the zip file that is downloaded.
- After that, double click the unzipped file.
- After that, click ‘Yes’ when asked for permission from User Account Control.
- Follow all the given commands on the installating screen.
- When the drivers are installed, click on ‘OK’. Then click on ‘Next’ to restart your computer.
Method 2: Run a Disk Check on Your System
A Hard Drive that is corrupted can create problems while working. This is the most severe of all the computer faults noted so far. Here, it is explained how to run a disk check on your system, and it can be work as a very useful tool for correct major errors.
It is explained how to run CHKDSK in Windows 10 in the steps below.
- In order to start firstly, you have to open a new File Explorer window (click Windows key + E). After that, click on the computer. Then, just Right-click on drive which is to be scanned – commonly this will be your ‘C: Drive’ or ‘D: Drive’. Then click on ‘Properties’.
- The Window Properties at the selected drive will open now. Now, click on the ‘Tools’ tab. Then, click on ‘Check’ which is under the ‘Error check section’.
- If everything is running smoothly on your computer, it will show a window that will objectify that don’t need to scan the drive. However, if you would want to run a CHKDSK scan, you are free to proceed by clicking on ‘Scan drive’ below that.
- The function check will be started by CHKDSK. Based on the size of your drive, and amount of data stored in it, the process can take from a few minutes to half an hour, only.
- everything went smoothly, you are gonna receive the good news that drive has been completed and fulfilled, and no errors were to be found.
Method 3: Check For Updates for the Drivers of Your Graphic Card
Updates for Windows 10, along with devices, network adapters, monitors, printers, and video cards, automatically download and are installed after Windows Update. If you want to update or reinstall a driver, here is how you should:
- First of all, use the ‘Device Manager’ to update the driver.
- Then, update the device driver.
- Then, in the search box , enter device manager, and then select ‘Device Manager’.
- After that, select a specific category to see the names of the devices, and then right-click the one you want to update.
- Then, select the ‘Search automatically’ for updating driver software.
- At the last, select the ‘Update Driver’ icon.
In case, the Windows don’t find a new driver, you can also try to look for the one on the device master’s website and follow these steps.
- First, reinstall the device driver.
- Then, in the search box , on the taskbar, enter the device manager, and , then select ‘Device Manager’.
- Thirdly, riight-click the name of the device, and then select ‘Uninstall’.
- Then, reboot your computer.
- At the last, windows will reinstall the driver.
Method 4: Run a Memory Check On the System
Here goes how to do it:
- Firstly, open the Control Panel.
- Then, you have to click on System and Security.
- After that, you have to click on Administrative Tools.
- Then, double-click on the Windows Memory Diagnostic shortcut.
- At the last, but not the least, just click on the Restart now and check problems option.
And once when your computer restarts, it will start in the Windows Memory.
Method 6: Change the Graphics Card
Whenever you have a dual graphic on Windows computer, then, it is better to use ‘Intel HD’ graphics.
- Firstly, click on Start Button, type ‘Winver’ and click on Enter.
- Remember, If you are not running version 1903 of Windows 10, you must update that version.
- Thirdly, Click on the link given below. After that, click on ‘Update Now’ to immediately bring windows 1903 version into your PC right up to date.
https://www.microsoft.com/en-us/software-download/windows10
- And then, when once you got version 1903 of Windows 10, you can also right click the on the icon of any given application and can run that on the specific graphics card.
Method 7: Update Your Windows
How to Update Windows 10:
- First of all, select the ‘Start (Windows)’ button which is on the bottom-left corner.
- After that, go to ‘settings’.
- Thirdly, do select the ‘Update and Security icon’.
- Then you have to choose’ Windows Update’ tab in the sidebar.
- Then, at last, click on check for updates. If there will be an available update, it will begin downloading automatically, perfectly.
Read Also:
Conclusion
All these errors that are mentioned rarely come at the surface of many that we can encounter and face while we use Windows 10. In my experience, they are the most common errors you will face.
If you encounter or face a specific major error , not included in my post, a quick Google search would prove very useful at understanding why it happened on your PC and how to fix it.


