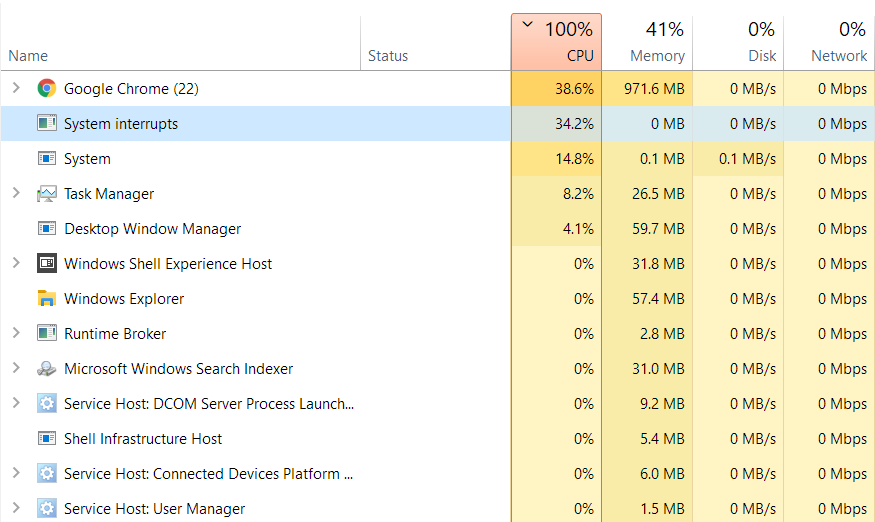
System interrupts are an issue faced by most of the heavy users which leads to the system lagging and making the processes slow. Now you may go to the task manager and see the various programs causing it but it shall not give you the real picture behind it.
There are a lot of processes which are executed each second when your system is put to use, system interrupt simply redirects potential of the hardware towards the process which the system thinks are of more significance.
The hardware is bound to certain capabilities and if the processes running go beyond its capability the system interrupt appears.
Understanding System Interrupts
Before delving into the error, it’s essential to understand what system interrupts are. System interrupts are a fundamental part of computer hardware and software interactions.
They are signals sent by hardware devices or software processes to notify the CPU that they need attention or action. These interrupts are crucial for various system operations, such as handling hardware requests and multitasking.
Read Also:
- Taskbar Showing in FullScreen
- .NET Runtime Optimization Service
- Digital TV Tuner Device Registration Application
What is the “System Interrupts High CPU Usage” Error?
The “System Interrupts High CPU Usage” error occurs when the “System Interrupts” process consumes an unusually high percentage of the CPU’s processing power.
This high CPU usage by “System Interrupts” can lead to sluggish system performance, delays in processing tasks, and an overall less responsive computing experience.
Common Symptoms of the Error
Users encountering the “System Interrupts High CPU Usage” error may experience the following symptoms:
- High CPU Usage: The task manager may show that the “System Interrupts” process is utilizing a significant portion of the CPU’s processing power, often exceeding 50% or even higher.
- Reduced System Responsiveness: The computer may become noticeably slower, with delays in launching applications, opening files, or navigating the operating system.
- Overheating and Fan Noise: The increased CPU usage can cause the computer to overheat, leading to fan noise as the cooling system works to manage the heat.
- Reduced Battery Life (Laptops): Laptop users may observe decreased battery life due to the elevated CPU usage, causing the system to drain the battery more rapidly.
Causes of the System Interrupts High CPU Usage Error
Several factors can contribute to the “System Interrupts High CPU Usage” error. Identifying the underlying causes is essential for effective resolution. Common causes include:
- Hardware Issues:
- Faulty or malfunctioning hardware components, such as a malfunctioning keyboard, mouse, USB device, or a failing hard drive, can generate excessive system interrupts, leading to high CPU usage.
- Outdated or Incompatible Drivers:
- Outdated or incompatible device drivers, particularly for hardware components, can trigger system interrupts, resulting in high CPU usage.
- Hardware Conflicts:
- Hardware conflicts, such as resource conflicts between devices or driver conflicts, can lead to a higher number of system interrupts.
- Interrupt Storms:
- Interrupt storms occur when a hardware device generates a continuous stream of interrupts due to a malfunction or misconfiguration, causing high CPU usage.
- Overheating or Hardware Failure:
- Overheating of the CPU or motherboard components can lead to increased system interrupts, as the system tries to manage temperature-related issues.
How to Fix System Interrupts High CPU Usage
Now when you open your task manager you shall see the percentage for system interrupts, it shall lie in the range of 2-3 in normal scenario. In case if it is 20% or more, it signifies serious trouble with the system.
Here are some solutions to prevent the same and keep it in control:
Method 1: Disabling USB Root Hubs
So, the USB root hub is a software that lets you connect multiple USB devices to your system.
Now, you have used only certain USB hubs. So we can disable the others which are not in use.
Now essentially our keyboard and mouse are also connected to the same hub. So we should move on carefully with disabling it, to fix high CPU usage.
Step 1: Press Windows + R, type “devmgmt.msc” and press Enter.
Step 2: In the device, expand the category of “Universal Serial Bus Controllers” to locate the root hubs listed.
Step 3: Right-click on the hub and select properties. Then click on the power to know that your device is connected to it.
Step 4: After you identify the hub where your mouse and keyboard are connected to you shall disable the remaining by right-clicking and selecting disable.
Step 5: Reboot your system and revert changes whenever you wish to.
Read Also:
Method 2: Disabling Audio Enhancements
There are some drivers who use an enhancement to improve quality. If it doesn’t work effectively it can lead to a load on the CPU. To control this, we can easily disable them.
It’s not necessary for the sound driver to do this but still, we can have a check upon.
Step 1: Run Control Panel.
Step 2: Type sound in the search bar.
Step 3: Open sound option, click on the audio device connected. Right-click and select properties.
Step 4: Now you’ll be able to see Enhancement tab, uncheck all the enabled enhancements.
Step 5: Select the advance tab and uncheck exclusive mode. Save and exit.
Revert as per your wish.
Method 3: Disabling the Wake on Magic Packet Settings
There is a feature which allows the adapters to wake up your PC while transmission of data takes place, referred to as “Wake on Magic Packet”. This is one of the reasons causing high CPU usage. We can thus disable this from settings.
Step 1: Press Windows + R, type “devmgmt.msc” and press Enter.
Step 2: In the device manager click on network adapters.
Step 3: Select your ethernet and WIFI device, right-click and select properties.
Step 4: Go to the advance tab. At the end of the properties, you’ll find Wake on Magic Packet disable it, save and exit.
Method 4: Installing Intel Rapid Storage Technology
Intel Rapid storage technology is a beautiful tool to improve performance for systems equipped with SATA disks.
When using one or multiple SATA disk drives, you can take advantage of the performance with less power consumption. This tool is available at Intel’s official website. Once installed you shall see an icon in the taskbar.
Method 5: Turning off Fast Start-up
Windows 10 Fast Start-up is a feature by which the system keeps things in such a way that the booting up ultimately takes up less time. The windows keep the system state by hibernating. As soon as you restart things get started up really quickly.
Its simple to disable it and people had significant results over there CPU usage.
Step 1: Firstly, run the control panel.
Step 2: Secondly, go to power options.
Step 3: After that choose the “Choose what the power buttons do” option.
Step 4: There shall be an option “Change Settings that are currently unavailable”. Click it.
Step 5: Now head to the bottom and uncheck the box “Turn on fast start-up”. Save changes and exit.
Step 6: Lastly, restart your device.
Method 6: Troubleshooting Devices and Drivers
Now if your problem still remains unsolved it certainly can be due to some particular driver/device.
We shall start off with the external devices and then come on to internal devices.
Step 1: First of all, disconnect all external devices, which you possibly can. Disconnect them step by step and observe the CPU usage, as soon as it comes down you have found the fault.
Step 2: If you are unable to find ant fault we shall proceed to internal device.
Press Windows + R, type “devmgmt.msc” and press Enter. In the device manager, search network adapter, sound cards, etc. After disabling them one by one sees the effect on the CPU usage.
Avoid disabling important system devices such as disk drives, display adapters, anything under computer, processor, or system device categories.
If even this fails you shall make sure that the drivers in your system are updated.
This is a difficult part as you need to update the drivers manually.
Download the drivers from manufacturers website first and save them.
Right-click on any driver and select “Browse my computer for driver software”.
Choose the desired location and select it and update your drivers by this.
Read Also:
- System Interrupts High CPU Usage
- CartoonCrazy
- IDP.Generic
- nvlddmkm.sys
- The Requested Operation Requires Elevation


