It’s hard to imagine the computers of the future without projecting onto them the properties and limitations of those we think we know today.
Coming to the operating system “Windows” made a compelling mark across the computer world by not only providing keen algorithmic work but also by there rapid reactions to limitations in there work in the form of updates, with there flawless updates Windows provides its users with ravishing features and polished performance.
Along with these features and performance Windows also holds a unique place in security features for its users even though there are times when the updates may open a channel for bugs, at the end of the day, these updates are considerate for the users but, sometimes you might not be able to access your update in your Windows.
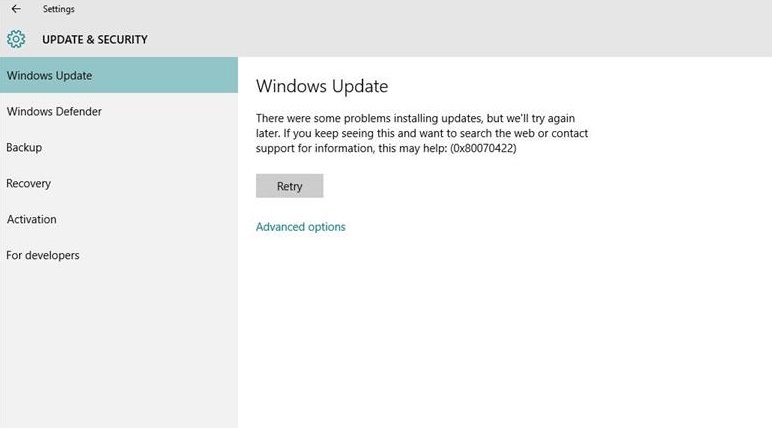
There are a lot of users who see this case most often in Windows 0x80070422 at the time of updating there Windows. This update error comes to play with a message carrying the reason as a code error along with the statement failed to install.
Here there will be four methods coming into play to fix the user error with some technical knowledge they are check service, start Windows update server, disabling IPv6, Enable/Disable network list service.
Read Also:
- Taskbar Showing in FullScreen
- .NET Runtime Optimization Service
- Digital TV Tuner Device Registration Application
Understanding the 0x80070422 Windows 10 Update Error
The 0x80070422 error code is a common issue that users may encounter when attempting to update their Windows 10 operating system.
This error code is associated with Windows Update, the built-in service responsible for downloading and installing updates, including security patches, feature improvements, and bug fixes.
Common Symptoms of the Error
When the 0x80070422 error occurs, you may experience the following symptoms:
- Failed Updates: The most noticeable symptom is the failure to download or install Windows updates. You will typically receive an error message indicating the update couldn’t be completed.
- Error Message: The error message accompanying the 0x80070422 code may provide additional details about the cause of the update failure.
- Delayed Updates: Updates may be repeatedly postponed or delayed, preventing your system from staying up to date with the latest patches and features.
Causes of the 0x80070422 Windows 10 Update Error
Several factors can contribute to the 0x80070422 error code, and identifying the underlying cause is essential for effective resolution. Common causes include:
- Windows Update Service Disabled: If the Windows Update service is not enabled or is set to manual startup, it can lead to the 0x80070422 error as the service needs to be running to install updates.
- Network Configuration Issues: Network-related problems, such as firewall settings or a misconfigured proxy, can interfere with Windows Update and trigger the error.
- Windows Update Components Corruption: Corruption within the Windows Update components, including system files and the update database, can disrupt the update process and lead to errors like 0x80070422.
- Software Conflicts: Conflicts with third-party security software or applications that modify system settings can interfere with the Windows Update service.
- Incorrect Time and Date Settings: Incorrect system date and time settings can disrupt secure connections to Windows Update servers, causing update failures.
How to Fix Windows 10 Update Error 0x80070422
Method 1: Check Service
To make your update work function complete, the user needs to make sure about some services that come into the play in your Windows. so keep a mark about these services and run these services by following the steps mentioned below:
Step 1: Firstly hold “Windows key” and press ‘R‘ so that you will be accessed to Run Window.
Step 2: Here you need to give “services.msc” as a command which will redirect a new window where you can locate the service Network connections.
Step 3: Keep your attention on its status column. As a result, you will be able to understand the status of network connections.
Step 4: Make sure it is running in case it not in a running state. Then you need to make a right-click on network connections and press start.
In this way, the user will be able to run the network connections service.
Method 2: Start Windows Update Service
Windows Update service acts as a mediating bridge between the system limitations and system updates. The wording itself remarks that it handles all the Windows system updates.
To make your update error-free you need to make sure that your Windows Update service is inactive condition.
Also, the functional status of its setup should be automatic. In case your system is not in this condition, follow these steps and make some changes to make your update lucrative
Step 1: First and foremost, you need to hold your “Windows key” and press “R” to access your Run Window.
Step 2: Give your command in the command box as “service.msc” and press Enter.
Step 3: Locate Windows Update Service and double click on Windows Update Service to open Windows Update Service properties.
Step 4: Select the automatic from the drop-down menu in the startup type section(if it isn’t already).
Step 5: Also, click start if the service startup is stopped and apply your changes by clicking on Apply.
Step 6: Press OK in the Window. Now check your Windows Update, just in case your issue is not solved or still you are seeing the original error you should move on Method 3.
Method 3: Disabling IPv6
Disabling IPv6 is the solution for solving maximum error cases for Windows users. So, try disabling IPv6. Then check your Windows Update to complete. To disable IPv6 you need to go through the following steps.
Step 1: Hold ‘Windows key’ and press ‘R’ to open your Run Window.
Step 2: Type ncpa.cpl as command and press Enter so you can access network connection Window go through the Window.
Step 3: Give a Right Click on Network Connections that you are connected to and select its properties so that you will be taken to Wifi-properties Window. There you should Uncheck the option Internet Protocol Version 6 (TCP/IPv6) from “This connection uses the following items:”
Step 4: If you can’t see the option you need to scroll down within the box. Then, uncheck the option and click on OK. furthermore, you need to reboot your system.
Method 4: Enable/Disable Network List Service
This method also finds useful in solving update errors in Windows. Just by disabling and enabling the network list service you run your update. The disabling and enabling depend on the initial condition of this service i.e if the service is functioning you need to disable it.
In case if the service is not running you need to start or enable the service. The reason behind this start and stops the run process is because disabling this service works for some users and enabling the service works for some users.
To make this process done you need to go through the following steps:
Step 1: Hold your Windows key and press R so that you can open Run Window.
Step 2: Then you need to give the command service.msc, locate your network list service.
Step 3: If the startup type is either Disable or Manual makes it Automatic from the drop-down menu. Also, make sure that service status is started if not make it start.
Step 4: In case the startup type is either Automatic or enable just to turn it disable. Click stop if the status is running and last, click Apply, and then OK.
Read Also:
Conclusion
The above-mentioned methods will take part in major error correction issues. After conducting all these methods run your Windows Update it should work fine and good.
In case your update is not functional, go through Configure the Windows update service to start Automatically or Use a.BAT file to fix the problem.


